쿠버네티스 간략 소개
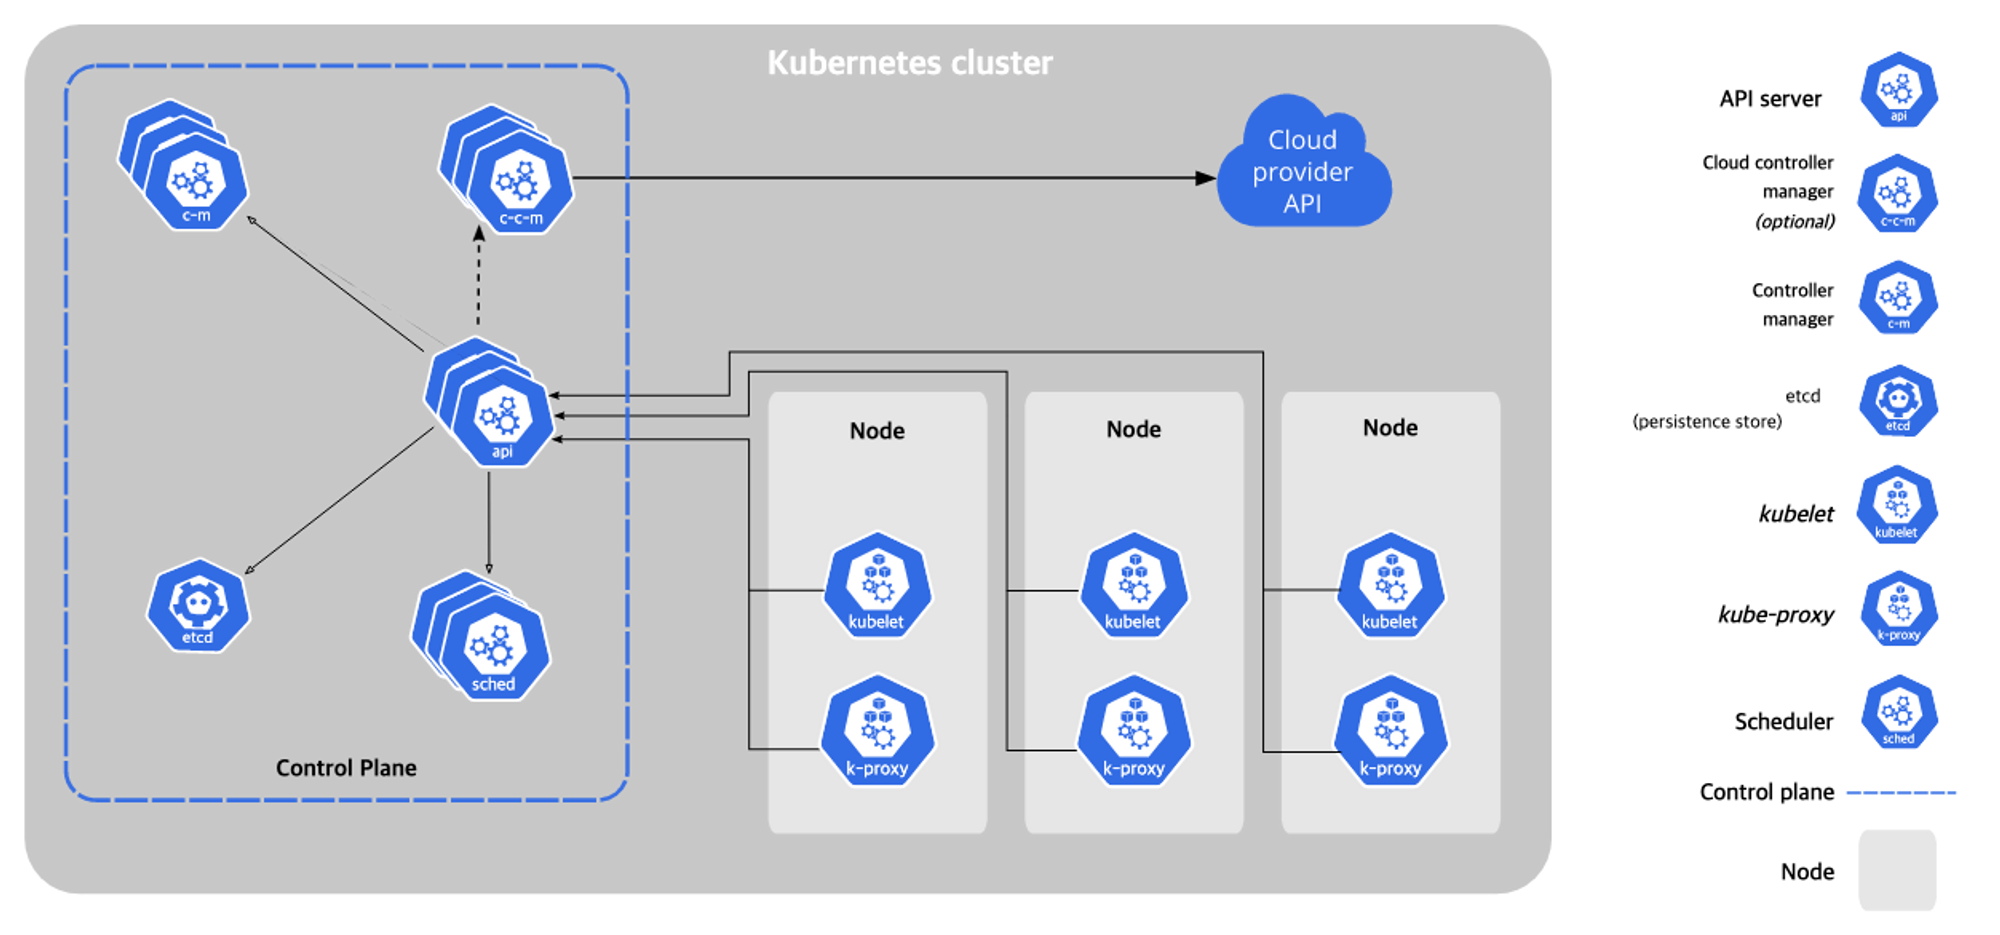
Control Plane : 마스터노드라고도 하고, 쿠버네티스의 모든 리소스를 관리하고 통제하는 역할을 한다.
Cloud Provider API : EKS와 같이 쿠버네티스 클러스터를 특정 클라우드 벤더사에서 직접 활용할 경우 Cloud Provider API를 활용한다.
Node : 워커노드라고 하며, 실제 컨테이너가 동작되는 공간을 말한다.
etcd : 클러스터 구성정보에 대한 메타데이터로 key:value형태의 저장소이다.
kubelet : 쿠버네티스 데몬 중 하나로 모든 노드에 동작하며, api 통신과 데몬셋 등을 관리한다.
KOPS란 무엇인가?
Kops는 Kubernetes Operations의 약자로, 쿠버네티스 클러스터를 배포, 업그레이드 및 관리하는 도구입니다. Kops는 쿠버네티스 클러스터의 인프라스트럭처를 코드화하고, 이를 자동화된 방식으로 관리할 수 있게 해줍니다. https://kops.sigs.k8s.io/ 에서 다양한 정보를 확인할 수 있습니다.
Welcome - kOps - Kubernetes Operations
For a better viewing experience please check out our live documentation site at kops.sigs.k8s.io. kOps - Kubernetes Operations The easiest way to get a production grade Kubernetes cluster up and running. What is kOps? We like to think of it as kubectl for
kops.sigs.k8s.io
KOPS 구성 아키텍처

Kops Cluster 배포
# yaml 파일 다운로드
curl -O https://s3.ap-northeast-2.amazonaws.com/cloudformation.cloudneta.net/K8S/kops-new-ec2.yaml
kops-new-ec2.yaml 소개
Parameters:
  KeyName:
    Description: Name of an existing EC2 KeyPair to enable SSH access to the instances. Linked to AWS Parameter
    Type: AWS::EC2::KeyPair::KeyName
    ConstraintDescription: must be the name of an existing EC2 KeyPair.
  SgIngressSshCidr:
    Description: The IP address range that can be used to communicate to the EC2 instances
    Type: String
    MinLength: '9'
    MaxLength: '18'
    Default: 0.0.0.0/0
    AllowedPattern: (\d{1,3})\.(\d{1,3})\.(\d{1,3})\.(\d{1,3})/(\d{1,2})
    ConstraintDescription: must be a valid IP CIDR range of the form x.x.x.x/x.
  LatestAmiId:
    Description: (DO NOT CHANGE)
    Type: 'AWS::SSM::Parameter::Value<AWS::EC2::Image::Id>'
    Default: '/aws/service/ami-amazon-linux-latest/amzn2-ami-hvm-x86_64-gp2'
    AllowedValues:
      - /aws/service/ami-amazon-linux-latest/amzn2-ami-hvm-x86_64-gp2

Resources:
  MyVPC:
    Type: AWS::EC2::VPC
    Properties:
     EnableDnsSupport: true
     EnableDnsHostnames: true
     CidrBlock: 10.0.0.0/16
     Tags:
        - Key: Name
          Value: My-VPC

  MyIGW:
    Type: AWS::EC2::InternetGateway
    Properties:
      Tags:
        - Key: Name
          Value: My-IGW

  MyIGWAttachment:
    Type: AWS::EC2::VPCGatewayAttachment
    Properties:
      InternetGatewayId: !Ref MyIGW
      VpcId: !Ref MyVPC

  MyPublicRT:
    Type: AWS::EC2::RouteTable
    Properties:
      VpcId: !Ref MyVPC
      Tags:
        - Key: Name
          Value: My-Public-RT

  DefaultPublicRoute:
    Type: AWS::EC2::Route
    DependsOn: MyIGWAttachment
    Properties:
      RouteTableId: !Ref MyPublicRT
      DestinationCidrBlock: 0.0.0.0/0
      GatewayId: !Ref MyIGW

  MyPublicSN:
    Type: AWS::EC2::Subnet
    Properties:
      VpcId: !Ref MyVPC
      AvailabilityZone: !Select [ 0, !GetAZs '' ]
      CidrBlock: 10.0.0.0/24
      Tags:
        - Key: Name
          Value: My-Public-SN

  MyPublicSNRouteTableAssociation:
    Type: AWS::EC2::SubnetRouteTableAssociation
    Properties:
      RouteTableId: !Ref MyPublicRT
      SubnetId: !Ref MyPublicSN

  KOPSEC2SG:
    Type: AWS::EC2::SecurityGroup
    Properties:
      GroupDescription: kops ec2 Security Group
      VpcId: !Ref MyVPC
      Tags:
        - Key: Name
          Value: KOPS-EC2-SG
      SecurityGroupIngress:
      - IpProtocol: tcp
        FromPort: '22'
        ToPort: '22'
        CidrIp: !Ref SgIngressSshCidr

  KOPSEC2:
    Type: AWS::EC2::Instance
    Properties:
      InstanceType: t2.micro
      ImageId: !Ref LatestAmiId
      KeyName: !Ref KeyName
      Tags:
        - Key: Name
          Value: kops-ec2
      NetworkInterfaces:
        - DeviceIndex: 0
          SubnetId: !Ref MyPublicSN
          GroupSet:
          - !Ref KOPSEC2SG
          AssociatePublicIpAddress: true
          PrivateIpAddress: 10.0.0.10
      UserData:
        Fn::Base64:
          !Sub |
            #!/bin/bash
            hostnamectl --static set-hostname kops-ec2

            # Change Timezone
            ln -sf /usr/share/zoneinfo/Asia/Seoul /etc/localtime

            # Install Packages
            cd /root
            yum -y install tree jq git htop
            curl -LO "https://dl.k8s.io/release/$(curl -L -s https://dl.k8s.io/release/stable.txt)/bin/linux/amd64/kubectl"
            install -o root -g root -m 0755 kubectl /usr/local/bin/kubectl
            curl -Lo kops https://github.com/kubernetes/kops/releases/download/$(curl -s https://api.github.com/repos/kubernetes/kops/releases/latest | grep tag_name | cut -d '"' -f 4)/kops-linux-amd64
            chmod +x kops
            mv kops /usr/local/bin/kops
            curl "https://awscli.amazonaws.com/awscli-exe-linux-x86_64.zip" -o "awscliv2.zip"
            unzip awscliv2.zip
            sudo ./aws/install
            export PATH=/usr/local/bin:$PATH
            source ~/.bash_profile
            complete -C '/usr/local/bin/aws_completer' aws
            ssh-keygen -t rsa -N "" -f /root/.ssh/id_rsa
            echo 'alias vi=vim' >> /etc/profile
            echo 'sudo su -' >> /home/ec2-user/.bashrc
            curl -s https://raw.githubusercontent.com/helm/helm/master/scripts/get-helm-3 | bash
            wget https://github.com/andreazorzetto/yh/releases/download/v0.4.0/yh-linux-amd64.zip
            unzip yh-linux-amd64.zip
            mv yh /usr/local/bin/

Outputs:
  KopsEC2IP:
    Value: !GetAtt KOPSEC2.PublicIp
KOPS를 CloudFormation으로 시작한 후 다음 명령어를 통해 EC2 아이피와 SSH 로그인을 진행한다.
# CloudFormation 스택 배포 완료 후 EC2 IP 출력
aws cloudformation describe-stacks --stack-name mykops --query 'Stacks[*].Outputs[*].OutputValue' --output text
예시) 3.35.54.9

# kOps-ec2 에 SSH 접속
예시) ssh -i <My SSH Keyfile> ec2-user@3.35.54.9
S3 버킷을 통한 상태 관리
- 테라폼의 tfstate 파일 처럼 kops 클러스터에 대한 상태 정보를 관리하기 위해서 S3를 사용한다.
# 배포 시 참고할 정보를 환경 변수에 저장
## export NAME=<자신의 퍼블릭 호스팅 메인 주소>
## export KOPS_STATE_STORE=s3://(자신의 버킷 이름)
export KOPS_CLUSTER_NAME=<자신의 퍼블릭 호스팅 메인 주소>
export KOPS_STATE_STORE=<s3://(자신의 버킷 이름)>
export AWS_PAGER=""
export REGION=ap-northeast-2

## 예시)
export AWS_PAGER=""
export REGION=ap-northeast-2
export KOPS_CLUSTER_NAME=devopsjames.com
export KOPS_STATE_STORE=s3://jangh-test
echo 'export AWS_PAGER=""' >>~/.bashrc
echo 'export REGION=ap-northeast-2' >>~/.bashrc
echo 'export KOPS_CLUSTER_NAME=devopsjames.com' >>~/.bashrc
echo 'export KOPS_STATE_STORE=s3://jangh-test' >>~/.bashrc
KOPS 클러스터 설치
모든 준비가 완료되면 클러스터 배포를 실행합니다.
kops create cluster --zones="$REGION"a,"$REGION"c --networking amazonvpc --cloud aws \
--master-size t3.medium --node-size t3.medium --node-count=2 --network-cidr 172.30.0.0/16 \
--ssh-public-key ~/.ssh/id_rsa.pub --name=$KOPS_CLUSTER_NAME --kubernetes-version "1.24.10" -y
INSTANCE GROUPS
NAME ROLE MACHINETYPE MIN MAX SUBNETS
control-plane-ap-northeast-2a ControlPlane t3.medium 1 1 ap-northeast-2a
nodes-ap-northeast-2a Node t3.medium 1 1 ap-northeast-2a
nodes-ap-northeast-2c Node t3.medium 1 1 ap-northeast-2c
External DNS
External DNS는 쿠버네티스 클러스터 내부의 서비스나 인그레스와 같은 리소스를 외부 DNS 서비스에 자동으로 등록해주는 오픈소스 도구입니다. 최근에는 다양한 클라우드 벤더사에서 사용할 수 있는 add on이라 더욱 유용합니다.

External DNS 를 활용해서 마리오 게임 배포하기
마리오게임설치
# mario 게임 yaml 배포
curl -s -O https://raw.githubusercontent.com/gasida/PKOS/main/1/mario.yaml
kubectl apply -f mario.yaml
cat mario.yaml | yh

# 배포 확인
kubectl get deploy,svc,ep mario
watch kubectl get svc mario

# 마리오 게임 접속
kubectl get svc mario -o jsonpath={.status.loadBalancer.ingress[0].hostname} | awk '{ print "Maria URL = http://"$1 }'

NAME    TYPE           CLUSTER-IP	EXTERNAL-IP                                                                    PORT(S)        AGE
mario   LoadBalancer   100.66.217.226   aa138713375064413b210b0a98aa2e2f-1946106069.ap-northeast-2.elb.amazonaws.com   80:30101/TCP   4m55s

쿠버네티스 클러스터에 ExternalDNSUpdate 권한 부여
# CLB에 ExternanDNS 로 도메인 연결
kubectl annotate service mario "external-dns.alpha.kubernetes.io/hostname=mario.$KOPS_CLUSTER_NAME"

# 확인
dig +short mario.$KOPS_CLUSTER_NAME
kubectl logs -n kube-system -l k8s-app=external-dns

# 웹 접속 주소 확인 및 접속
echo -e "Maria Game URL = http://mario.$KOPS_CLUSTER_NAME"

# 도메인 체크
echo -e "My Domain Checker = https://www.whatsmydns.net/#A/mario.$KOPS_CLUSTER_NAME"
External DNS 레코드 배포
# 모니터링
watch -d kubectl get pod -A

# 정책 생성 -> 마스터/워커노드에 정책 연결
curl -s -O https://s3.ap-northeast-2.amazonaws.com/cloudformation.cloudneta.net/AKOS/externaldns/externaldns-aws-r53-policy.json
aws iam create-policy --policy-name AllowExternalDNSUpdates --policy-document file://externaldns-aws-r53-policy.json

# ACCOUNT_ID 변수 지정
export ACCOUNT_ID=$(aws sts get-caller-identity --query 'Account' --output text)

# EC2 instance profiles 에 IAM Policy 추가(attach)
aws iam attach-role-policy --policy-arn arn:aws:iam::$ACCOUNT_ID:policy/AllowExternalDNSUpdates --role-name masters.$KOPS_CLUSTER_NAME
aws iam attach-role-policy --policy-arn arn:aws:iam::$ACCOUNT_ID:policy/AllowExternalDNSUpdates --role-name nodes.$KOPS_CLUSTER_NAME

# 설치
kops edit cluster
--------------------------
spec:
  externalDns:
    provider: external-dns
--------------------------

# 업데이트 적용
kops update cluster --yes && echo && sleep 3 && kops rolling-update cluster

# externalDns 컨트롤러 파드 확인
[root@kops-ec2 ~]# kubectl get pod -n kube-system -l k8s-app=external-dns
NAME                            READY   STATUS    RESTARTS   AGE
external-dns-6d7585bcdf-28ftm   1/1     Running   0          11s
도메인 연동
# CLB에 ExternanDNS 로 도메인 연결
kubectl annotate service mario "external-dns.alpha.kubernetes.io/hostname=mario.$KOPS_CLUSTER_NAME"

# 확인
dig +short mario.$KOPS_CLUSTER_NAME
kubectl logs -n kube-system -l k8s-app=external-dns

# 웹 접속 주소 확인 및 접속
echo -e "Maria Game URL = http://mario.$KOPS_CLUSTER_NAME"

# 도메인 체크
echo -e "My Domain Checker = https://www.whatsmydns.net/#A/mario.$KOPS_CLUSTER_NAME"

자동으로 해당 레코드가 생성된 걸 볼 수 있다.

클러스터 삭제
# cluster 삭제
kops delete cluster --yes

# cloudformation 삭제
aws cloudformation delete-stack --stack-name mykops